OmniDr1ve SE User Manual
Overview
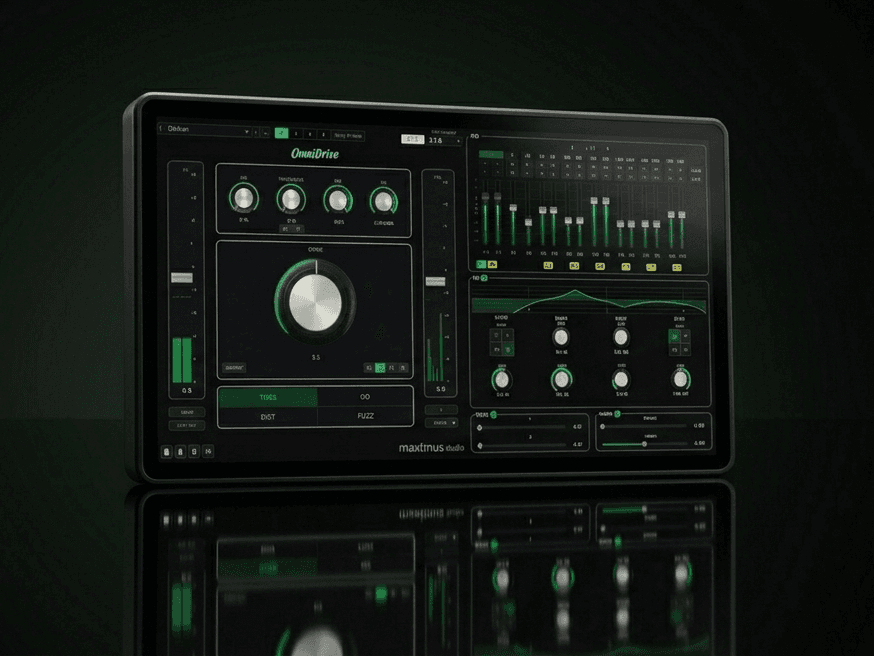
OmniDr1ve SE is the stereo edition of OmniDr1ve: four distortion modes, a built-in dimension chorus and precision filtering, on mono and stereo tracks. Use it on bass, guitars, synths, vocals, drums, and any material that needs grit, warmth, or outright destruction.
For surround and immersive work up to 9.1.6, with the S-M1xer surround section, upgrade to OmniDr1ve (see Licensing).
Main Controls
Drive (Center Knob)
The main distortion amount (0 to 10). Higher values push harder into the saturator. Per-mode gain staging keeps level changes musical across the sweep, but there is no automatic level control, so raising Drive on a hot input will get louder.
Mix
Wet/dry blend (0 to 100%). At 100% you hear only the distorted signal. Lower values blend in the clean signal for parallel distortion, which keeps the original transients while adding harmonics.
Drive Crossover
Splits the signal into two bands at the selected frequency. Only the upper band goes through the distortion; the lower band stays clean. This keeps sub-bass tight while distorting the harmonics above it. The arc ring around the knob shows which part of the spectrum is being distorted.
INV (Crossover Invert)
Distorts the band below the crossover frequency instead of the band above it. The arc ring on the crossover knob flips to show the inverted region. Use it to add grit to the low end while keeping the upper harmonics clean.
S (Crossover Solo)
Plays only the band being distorted and mutes the clean band. Use it to set the crossover frequency by ear. MIX is fixed at 100% while S is on.
HPF (Input High-Pass Filter)
High-pass filter on the input (0 to 1000 Hz). Removes sub-bass rumble before it reaches the distortion. The first 70% of the knob's travel covers 0 to 300 Hz, for fine control in the bass.
LPF (Output Low-Pass Filter)
Low-pass filter on the output (1 to 20 kHz). Tames harsh high-frequency content added by the distortion. At 20 kHz the filter is off.
Chorus
Dimension-style chorus after the distortion. Adds stereo width and movement with a warm, BBD-inspired character. Toggle it with the CHORUS button below the drive knob.
Distortion Modes
Select a mode from the 2x2 grid at the bottom of the plugin.
Tube
Soft asymmetric saturation with smooth harmonics, in the manner of a valve amp. Subtle bias drift and sag give it an analog feel. Gentle at low drive, increasingly rich at higher values.
OD (Overdrive)
Mid-focused overdrive with asymmetric soft clipping and tone shaping after the clipper. Punchy and musical, and good for adding presence and edge to bass lines without losing definition.
Dist (Distortion)
Hard clipping with a soft knee and a tone that darkens as the amount rises. Aggressive and forward, with plenty of harmonics and sustain, while keeping the attack of each note.
Fuzz
Germanium-transistor-style fuzz with a moving bias. Ranges from woolly warmth to sputtering chaos, including the sag of a dying battery. The fuzz stays silent when no audio is playing.
Oversampling
Select from the row of buttons below the drive knob:
- ZL (Zero Latency): no oversampling. Lowest CPU and no latency. May add aliasing at high drive settings.
- 2X: a good balance of quality and CPU.
- 4X: the default. Very little aliasing.
- 8X: the highest quality, at the highest CPU cost.
I/O Section
Input Gain (IN Fader)
Sets the level entering the plugin (-36 to +18 dB). More input drives the distortion harder. Without LINK OUT, more input also means more output.
Output Gain (OUT Fader)
Sets the final output level (-36 to +18 dB). Double-click to reset to 0 dB.
LINK OUT
Makes the output gain mirror the input gain in the opposite direction. Raise the input by 6 dB and the output drops by 6 dB, so you can change how hard the distortion is driven while the monitoring level stays about the same.
MONO
Sums the input to mono before processing. Useful for bass DI signals with slight stereo content, or to keep the distortion mono-compatible.
Meters
Stereo level meters on the input and the output.
Presets
Use the preset browser in the header to browse, load, and save presets.
- Factory presets are built into the plugin and cannot be overwritten.
- User presets are saved to your system and can be created, renamed, and deleted.
- A/B/C/D slots let you compare up to four settings quickly.
- Copy to Next copies the current slot's settings to the next slot.
OmniDr1ve SE has the same stereo factory presets as OmniDr1ve, so a preset sounds the same in both.
Presets from OmniDr1ve
If OmniDr1ve is installed on the same computer, its user presets appear under From OmniDr1ve in the preset browser. Loading one sets every OmniDr1ve SE control to match the preset. Its surround settings are ignored.
The presets you save in OmniDr1ve SE appear in OmniDr1ve under From OmniDr1ve SE.
GROUP
Link several OmniDr1ve SE instances together so one control moves them all. Useful when the same treatment is spread across several tracks.
The GROUP badge sits in the header, above the OUT meter. It reads GROUP with no number when the instance is on its own, and shows the group number, its name, and how many instances are in it once there is more than one. Click the badge to open the group panel.
OmniDr1ve SE instances group only with other OmniDr1ve SE instances. An OmniDr1ve SE and an OmniDr1ve in the same session cannot share a group.
Joining a group
Pick a number from 01 to 16, or NO GROUP to leave. Groups already in use elsewhere in the session show in their own color; unused ones stay dimmed, so you can see what is taken before choosing. Each group keeps the same color every time, so instances in one group are recognizable at a glance.
Joining does not change any settings. Every instance keeps its settings, and linking starts from the next control you move.
Naming a group
Type a name of up to 12 characters in the NAME field. It appears on the badge next to the number, and every instance in the group shows it. Leave it empty and the badge shows only the number.
The name field edits the group you are currently in, and no other.
What follows the group
Everything on the main panel follows the group: drive, mix, distortion mode, the crossover with INV and S, the input HPF and output LPF, CHORUS, MONO, oversampling, and the input and output trims.
How moves apply
- RELATIVE: every instance moves by the same amount and keeps the differences between them. An instance sitting 2 dB hotter stays 2 dB hotter. Any instance that reaches the end of a control's range stops there while the others carry on.
- ABSOLUTE: every instance jumps to the same value, and any differences between them are lost.
Switches and the distortion mode selector always match outright in both settings, since there is no halfway position on a four-way mode switch.
PUSH MY SETTINGS TO GROUP
Copies this instance's settings onto every other instance in the group. Use it to bring a group into line before riding them together. Available only when more than one instance is in the group.
Saving
Group membership, along with the group's name and relative/absolute setting, is saved with the session and restored when you reopen it. Loading a preset or switching between the A/B/C/D slots does not change which group an instance is in.
DAW Automation
The automation list mirrors the controls one-to-one: Input Trim, Output Gain, Drive, Mix, Dist Mode, Crossover, Crossover Invert, Crossover Solo, Input HPF, Output LPF, Input Mono, and Chorus.
Oversampling Mode, Link Out, and GROUP membership are saved with the session but cannot be automated.
When instances are linked with GROUP, a control move is applied to every member. If your DAW is in automation write mode, that writes automation on each of them.
Light Mode
Click the LIGHT button in the header to switch between the dark and light color schemes. The setting is remembered between sessions.
Licensing
Click the key icon in the footer to manage your license. You can activate a license key, start a trial, or buy a license from the dialog.
An OmniDr1ve license also unlocks OmniDr1ve SE. Activate OmniDr1ve SE with your OmniDr1ve key; on one computer it uses a single activation for both plugins.
Upgrading to OmniDr1ve
The UPGRADE button in the header, and the one in the license dialog, open the upgrade to OmniDr1ve. What you paid for OmniDr1ve SE comes off the price, and OmniDr1ve SE keeps working afterwards with no change of key. The button is hidden when OmniDr1ve SE is running on an OmniDr1ve license.
Help & Support
- Press the ? button below the OUT meter to enter help mode, then hover over any control to see what it does. The flag next to it chooses the tooltip language.
- Click the book icon in the footer for this manual.
- Click the lightbulb icon to request a feature.
- Click the bug icon to report an issue.
- Visit max1musaudio.com for support.